Communication and Connectivity
This chapter describes the different possibilities to interface with an HF2 Instrument. The HF2 Series was designed with the concept that "the computer is the cockpit"; there are no controls on the front panel of the HF2 Instrument, instead the user has the freedom to configure and stream data from the instrument directly from their computer. The aim of this approach is to give the user the freedom to choose where they connect to, and how they control, their HF2 Instrument. The user can connect directly from a computer connected to the HF2 Instrument via USB or remotely from a different computer on the network, away from their experimental setup. Then, on either computer, the user can configure and retrieve data from their HF2 Instrument via a number of different interfaces, i.e. via the LabOne UI and/or their own custom programs. In this way the user can decide which connectivity setup and combination of interfaces best suits their experimental setup and data processing needs.
We first provide an overview of how the user connects an HF2 Instrument to a PC in Instrument Connectivity Overview and then give an overview of how to quickly modify instrument settings using the text-based console in ziServer’s Text-based Interface. Finally, at the end of this chapter, we explain how to connect to an HF2 instrument over a public network, Connecting to ziServer over insecure or networks behind firewalls.
Note
It is also possible to configure and obtain data from an HF2 Instrument via one of our APIs. Currently LabVIEW, Matlab, Python or C are available. These topics are covered in a separate document, The LabOne Programming Manual.
Note
New users could benefit by first familiarizing themselves with the instrument using the LabOne UI, see Tutorials.
Note
Programming using the Real-time Option (ziRTK) is dealt with in Real-time Option.
Instrument Connectivity Overview
The HF2 Series supports a server-based connectivity methodology for multi-user, multi-device operation. This means that it is possible to operate more than one HF2 Instrument from a single computer, that multiple users may access the same instrument, and that an instrument may be made available on a local area network. Server-based means that all communication between the user and the HF2 is via a computer program called a server, in our case ziServer. The ziServer program recognizes the device and manages all communication between the instrument and the host computer over the USB connection on one side, and the different available interfaces on the other side.
Before going into more detail, the terminology used in this chapter is explained.
- Host computer: The computer that is directly connected to the HF2 by USB. An HF2 can only be connected to one host computer, but to multiple remote computers on a local area network via ziServer running on the host.
- ziServer: A computer program that runs on the host computer and manages settings on, and data transfer to and from the HF2 by receiving commands from clients. It always has the most up-to-date configuration of the device and ensures that the configuration is synchronized between different clients.
- Remote computer: A computer, available on the same network as the host computer, that can communicate with the HF2 via the ziServer program running on the host.
- Client: A computer program that communicates with the HF2 via the server. The client can be running either on the host or the remote computer.
- API (Application Programming Interface): a collection of functions and data structures which enable communication between software components. In our case, the various APIs (e.g., LabVIEW, MATLAB®) for the HF2 provide functions to configure the device and receive measured experimental data.
- Interface: Either a client or an API.
- TCP/IP: Network communication protocols. In our case, ziServer communicates to the base API (ziAPI) using TCP/IP. This can happen either locally (entirely on the host computer) or between the host computer and remote computers.
- GUI (Graphical User Interface): A computer program that the user can operate via images as opposed to text-based commands.
- Modules: Software components that provide a unified interface to APIs to perform high-level common tasks such as sweeping data.
An overview of HF2 Instrument connectivity is shown in Figure 1.

Physical Connectivity: Host and Remote Computers
In a commonly used configuration, the HF2 Instrument is connected to a host computer where both the server and the clients (denoted by the orange boxes in Figure 1) run. The ziServer program acts as bridge from the instrument to the various clients. For example, a user may use two clients in parallel: the LabOne UI to configure the device and their own program created using the LabVIEW API to plot custom results streamed from the instrument. Both these clients communicate data via the same instance of ziServer and ziServer ensures that both clients are always updated with the current instrument configuration. Note however, that any combination of clients shown in Figure 1 may be used in parallel, limited only by the performance of the host computer and by the load from requests to ziServer. In this configuration, the top and bottom block of Figure 1 (denoted by the light blue box) are both running on the host computer.
Sometimes, the user wishes to use a client to control the HF2 on a remote computer. In this case, the software in the top block of Figure 1 runs on the remote computer, connecting via TCP/IP over the local area network to the instance of ziServer running on the host computer (which is connected to the HF2 via USB).
In total, there are three possibilities of physically connecting to an HF2 Instrument:
- On the host computer, i.e., all the software (ziServer, interfaces) is running on the same computer that is connected to the instrument via USB. This is the simplest and most common setup.
- On a remote computer connected to the host computer over a secure local area network. If a private network is available this is a simple setup, ziServer only needs to allow remote connections, see Enabling a Remote Connection to ziServer.
- On a remote computer connected to the host computer over a public, insecure network.
As you can now imagine, there are many possibilities to connect to an HF2 instrument. The following methods of connecting with HF2 Instruments are supported:
- Connection to and operation of an HF2 Instrument from multiple clients on different computers in parallel with automatic background update of instrument settings on all connected clients.
- Connection to and operation of up to 16 HF2 Instruments from a single host computer.
- Connection to and Operation of multiple remote HF2 Instruments that are connected on a TCP/IP LAN via a (or multiple) host computer(s), the number of which is limited by the performance of the remote computer. Note, there can only be one instance of ziServer running for one HF2 Instrument.
Software Connectivity: ziServer
The ziServer program provides a gateway to your HF2 Instrument from any of the programming interfaces described in this chapter. The ziServer program recognizes the device and manages all communication between the instrument and the host computer over the USB connection on one side, and the different available interfaces on the other side. Since ziServer is responsible for all communication to the instrument, it’s important that only one instance of ziServer is running at any one time. This is how you can check that only one instance of ziServer is running, or is indeed running at all:
- Windows: Open Windows Task Manager with CTRL-SHIFT-ESC and check
that both the processes
ziServer.exeandziService.exeare running. - Linux: Either check manually that the process
ziServeris running or alternatively use the `ziService` command
$ ziService status
in a terminal. You should see the output:
Status : ziServer is running.
Enabling a Remote Connection to ziServer
In order to enable connections to ziServer from a remote computer, the
node /zi/config/open must be set to 1. To set this in the LabOne UI
go to the Config Tab and under the Connectivity setting enable "From
Everywhere".
Instrument Communication: The Node Hierarchy
In order to communicate with an HF2 Instrument via text-based commands, it is necessary to understand how the settings and measurement data of the instrument are accessed. All settings of the HF2 Instrument are organized in a file-system-like hierarchical structure. This means that it is possible to plot a consistent tree of nodes, where the instrument settings are leaves of the tree. It is also possible to browse branches inside the tree as if the user were navigating in a file-system. This hierarchy is used, no matter which interface you use when performing measurements.
An example demonstrating the hierarchy is the representation of the first demodulator on the device, given by the node:
/devX/demods/0
which, as we’ve already noted, is very similar to a path on a
computer’s file-system. Note that, the top level of the path is the
device that you are connected to. The demodulators are then given as a
top-level *_node__ under your device-node and the node of the
first demodulator is indexed by 0. This path represents a branch in
the node hierarchy which, in this case, if we explore further, has the
following nodes:
/devX/demods/0/adcselect
/devX/demods/0/order
/devX/demods/0/timeconstant
/devX/demods/0/rate
/devX/demods/0/trigger
/devX/demods/0/oscselect
/devX/demods/0/harmonic
/devX/demods/0/phaseshift
/devX/demods/0/sinc
/devX/demods/0/sample
These nodes are *_leaves, the most bottom-level nodes which represent a
setting of an instrument or a field that can be read to retrieve
measurement data. For example, /devX/demods/0/adcselect is the leaf
that controls the setting corresponding to the choice of signal input
for the first demodulator. To set the index of the signal input the user
writes to this node. The leaf /devX/demods/0/sample is the leaf where
the demodulator’s output (timestamp, demodulated x-value, demodulated
y-value) are written at the frequency specified by
/devX/demods/0/rate. In order to obtain the demodulator output you
read the values from this node by *_polling this node. Polling a
node sends a request from the client to ziServer to obtain the data from
the node at that particular point in time.
Device Node Tree provides a full reference of nodes on HF2 Instruments and details which settings or measurement data they correspond to, whether they are read-only and, if they are writable, which values they may take (e.g., boolean, integer, floating point).
Note
The numbering on the front panel of the HF2 Instrument and the block numbering on the LabOne UI generally start with 1, whereas the underlying instrument using the programming interfaces has a numbering notation starting with 0.
Note
A useful method to learn about paths in your HF2 Instrument is to look at the output of the history in the bottom of the LabOne UI. The status line always shows the last applied command and you can view the entire history by clicking the "Show History" button. You will find paths like
/devx/sigins/0/ac = 1
after you switched on the AC mode for signal input 1, or
/devx/demods/1/rate =
        7200.000000
after setting the readout rate of demodulator 2 to 7.2 kHz.
You can obtain a list of nodes available on your instrument as a text-file in the LabOne UI by saving the instrument settings. Go to the Config tab in the Settings section click the Save button.
Note
We recommend that users who want to program their HF2 Instruments first familiarize themselves with the node hierarchy by browsing nodes via ziServer’s text-based interface described in the next chapter. The text-based interface is an indispensable tool for HF2 programmers.
ziServer’s Text-based Interface
The text-based interface is the simplest and most direct way of communicating with an HF2 Instrument and doesn't require any previous programming experience. Browsing the text interface physically happens within ziServer and since it makes use of TCP/IP sockets the user can also connect remotely over a network connection via telnet or ssh. In contrast to the LabOne UI, this is a geeky way of using an HF2 Instrument.
After connecting to the text-based interface via telnet, you find
yourself in a DOS or Unix terminal-like program, where you can browse
instrument settings in the node hierarchy (Instrument Communication:
The Node Hierarchy). The terminal responds to
known command syntax like ls (list all nodes in the current directory)
and cd (select path to navigate in the directory hierarchy).
The text interface is a very powerful tool for users programming an HF2 Instrument with other interfaces such as Zurich Instrument’s LabVIEW or MATLAB® API. It is a convenient way to verify the instrument’s node paths and check that values have been set correctly by the interface you are actually programming with. It is also helpful for budding HF2 hackers who can use it to browse the node hierarchy and familiarize themselves with its structure.
Note
In theory, it would be possible to use the text-based interface to communicate with an HF2 Instrument from an arbitrary programming environment. However, this would require the implementation of a socket connection and a parser, and there is no exception handling should a command fail. Also, since it’s a text interface, as opposed to a binary interface, data transfer is slower. Therefore, in general, we strongly encourage the user to instead use one of the existing binary interfaces documented later in this chapter as their primary programming interface.
Getting Started with the Text-based Interface
Preparation
The purpose of this section is to get quickly acquainted with the text interface to the ziServer. For this you will need to have installed LabOne (see Software Installation) and have your HF2 Instrument connected to your host computer via USB. In order to access the text-based interface within ziServer, a telnet or SSH client providing a console is required.

Connecting to ziServer on Windows
Zurich Instruments recommends to use the freeware PuTTY as a telnet client. PuTTY has to be configured with the following settings to connect with ziServer.
| Terminal category, Implicit CR in every LF | set |
| Session category, Host Name | localhost |
| Session category, Port | 8005 |
| Session category, Connection type | Telnet |
Users connecting to a remote ziServer (a ziServer which is not running on the local machine, but on the host computer available on the LAN) have to configure the host name accordingly (e.g. computer.domain.com) after allowing remote connections to ziServer, see Software Connectivity: ziServer.
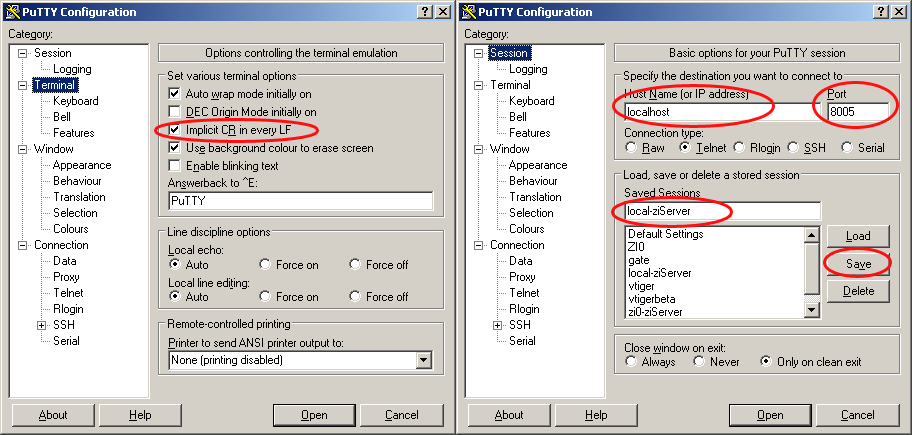
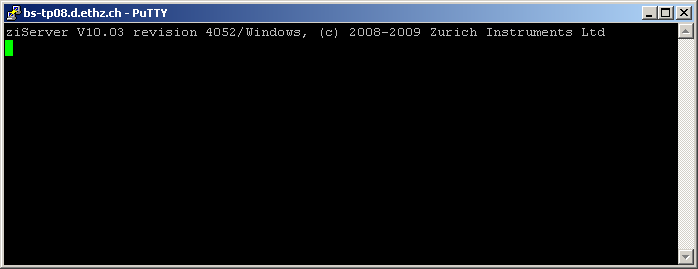
Save the session settings with a suitable name, so that you can connect faster next time. After pressing the Open button, the following screen will appear: this message confirms successful connection to the ziServer. If the screen does not appear, or the text is missing, please check whether ziServer is running (Windows task manager, see Software Connectivity: ziServer) or check your PuTTY settings.
Connecting to ziServer on Linux
You may connect to a running ziServer from the host computer by invoking telnet in a shell:
user@zi:~$ telnet localhost 8005
Trying 127.0.0.1...
Connected to localhost.
Escape character is '^]'.
ziServer V19.05 revision 62216/Linux, (c) 2008-2021 Zurich Instruments AG
Or by using netcat:
user@zi:~$ nc localhost 8005
ziServer V19.05 revision 62216/Linux, (c) 2008-2021 Zurich Instruments AG
A Tour of the Text-based Interface
We start our tour with some basic commands. After successful connection,
it’s nice to see which instruments are connected to ziServer. An ls
will do the job. This yields the information that we have a ZI node (the
node for ziServer) and a DEVX node (denoting your HF2 Instrument). The
DEVX is the serial number of the HF2 Instrument in front of you. Let’s
select the ziServer node with cd zi, list the nodes with ls, and
then read all values of the node inside the /ZI/ tree with / ?. Not
very impressive so far.
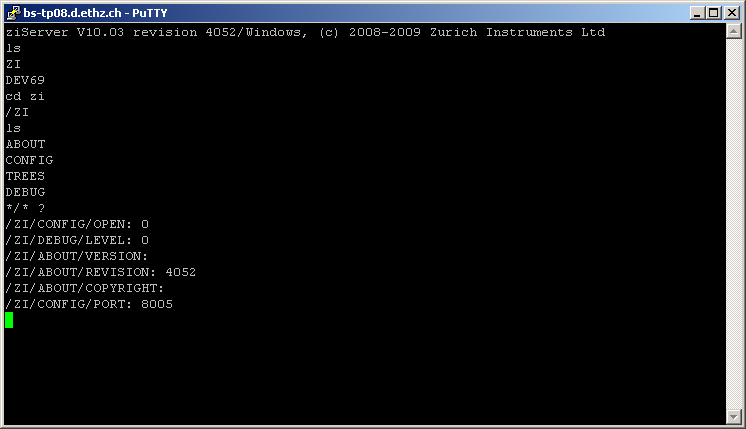
Let us move into the DEVX hierarchy by using the relative path
cd ../devx (it’s also possible to specify absolute paths, e.g.,
cd /devx/ and investigate the structure of the node hierarchy with the
ls command). This lists all the leaves inside of your device. Each leaf
represents a setting that can be made inside of the instrument or a
field that can be read to retrieve measurement data. The first level
hierarchy inside the instrument is displayed in Figure 6.

This list gives a top-level insight into an HF2 Instrument showing its building blocks such as DEMODS (demodulators), OSCS (oscillators), SIGINS (signal inputs), SIGOUTS (signal outputs), SCOPES (oscilloscopes), AUXINS (auxiliary inputs), AUXOUTS (auxiliary outputs), CPUS (integrated processors), and so on. The branches and leaves that you see will depend on the options installed in your device: for instance, you will not see PLLS if you do not have the HF2PLL option installed.
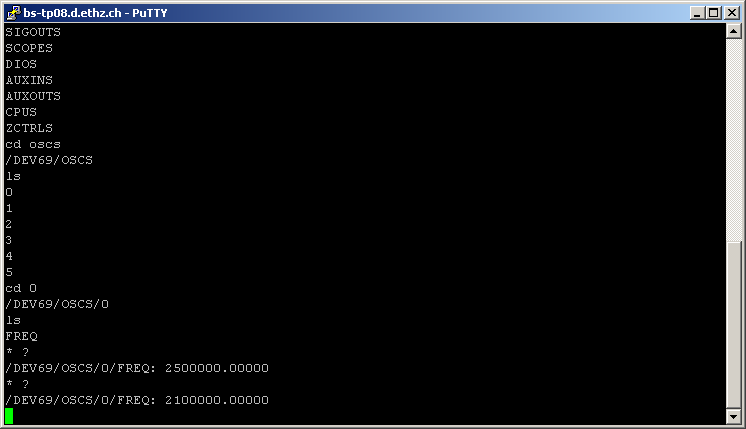
It is time to dive into one branch of the instrument. Let us take
oscillator 0: type cd oscs, then ls to see the branches at that
level, then type cd 0 to select the first oscillator, then list the
leaves at that level, and use * ? to return the values of all leaves.
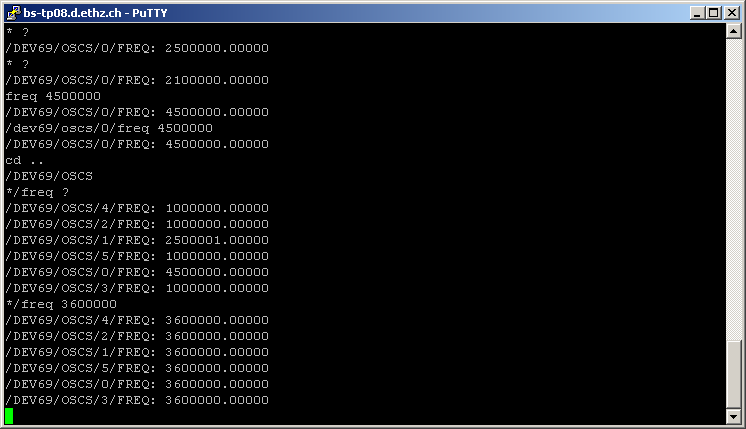
We see for instance that /DEVX/OSCS/0/FREQ has a value of 2.5 MHz, see
Figure 7.
It is now possible to check that the LabOne UI actually has the same
value in the corresponding field. Note, that the block numbering
notation inside of the GUI starts with 1, whereas the underlying
instrument has a numbering notation starting with 0. It is also possible
to change the frequency of the lock-in channel 1 inside of the GUI to
2.1 MHz, and then check the value inside the text interface by typing
* ?. You notice that the settings changes are transparent to all
clients connected to a ziServer. You can always rely on setting and data
consistency.
Next, to change the value of the oscillator frequency, for instance to
4.5 MHz, type freq 4500000. The same effect can be achieved by using
the absolute path /DEV8/OSCS/0/FREQ 4500000. Please note that the
value in the GUI has changed from 2.1 MHz to 4.5 MHz in the meantime.
The wildcard symbol * can simplify life when many similar settings need
to be made. Lets for instance check the frequency of all oscillators at
once: type cd .., and then */freq ?, and then change all frequencies
to 3.6 MHz with \*/freq 3600000. This is where the text interface is
becoming pretty powerful.
One word on scripting. It is possible to manually compile several
settings in a file using the syntax path value, then to copy-paste
them into the terminal window. The sequence will be recognized by the
ziServer and all defined settings will be made.
Note, another useful method to learn about the paths in your HF2
Instrument is to look at the bottom of the LabOne UI after changing
configuration (see this note). The
complete command history of a session is stored in the LabVIEW Data
directory, file com.zhinst.ziControlStatusLog.txt.
This concludes getting started with text-based programming. Zurich Instruments hopes you found it useful, and hopes you are going to perform some tutorials in Tutorials. Thank you for measuring with Zurich Instruments.
Command Reference
Commands
A complete lists of all available commands in the text-based interface
can be viewed in the interface by typing help.
Note
The text-based interface is case insensitive.
Nodes, Leaves and Paths
Every setting of the instrument is represented by a leaf as a terminal of a tree of nodes. There are also leaves which are not settings, but for instance used to retrieve data from the instrument. For each leaf there is a path and the related value.
path_list = path [path]
path = [/|/..|*]name[/name|*|**]
In the syntax above a name is a string, and the path is a list of names separated by a slash. If a path starts with a slash, it is an absolute path starting at the root of the hierarchy. The asterisk is a wildcard meaning all nodes at a given hierarchy, and two points in a row means one hierarchy higher.
Navigation and Trees
The navigation inside the text interface is performed with the
sel/cd/ls/tr commands.
sel or cd [?|..|path]
ls [path]
tr [path]
info [path]
The command cd ? feedbacks the current path, cd .. moves up one tree
level, cd path moves down one tree level. sel and cd are
equivalent commands. ls lists the tree available on the current path,
ls path lists the tree available on the specified path, tr lists the
complete tree on the current path, tr path lists the complete tree on
the specified path, info feedbacks the help string of the current
path, and info path reports the help string of a given path.
Get and Set Node Values
The values of nodes are read and changed with the following syntax.
path ?
path_list value
The command path ? returns the value of path, path value sets the
specified node to value, and path_list value sets several nodes to
value. Some examples:
about/* ?             // return values of leaves at path
devx/demods/0/* ?
/zi/config/* ?

/devx/demods/0/adcselect ?     // return value at path
/devx/demods/0/adcselect 0     // set value of leaf

/devx/demods/0/adcselect /devx/demods/1/adcselect 1
                               // multiple set value
Subscriptions
The ziServer provides a mechanism to automatically send all changes to a leaf to a subscribed client. This mechanism efficiently informs a client whenever a setting or a data of the instrument has changed without the need of active polling. It is possible to subscribe to single leaves, or full trees.
When a value of a subscribed leaf changes, the updated value is sent to the client. Most often samples, error and status nodes are subscribed. If one needs to maintain a user interface, then this can be done using subscriptions.
If you subscribe or unsubscribe from a node which is not a leaf, the subscription propagates to all nodes of the subtree. For example, you could first subscribe a subtree and then unsubscribe specific nodes within this subtree and still receive events for all nodes except for unsubscribed ones.
subs path_list       // subscribe
unsubs path_list     // unsubscribe

path value           // return value for subscribed leaf
The following sequence illustrates subscribe and unsubscribe commands following each other, where turquoise leafs denote subscribed leafs.
| Initial state - no leaf is subscribed | After subscribing the root node | After unsubscribing the node 1 |
|---|---|---|
 |
 |
 |
The first image shows the initial state with no leaf subscribed. This state corresponds to a newly initiated ziServer session. After subscribing the root node, all leafs become subscribed. Then it is for instance possible to unsubscribe node 1 in order to leave just the leafs below node 2 subscribed.
Scripting
It is possible prepare a sequence of commands in a text editor and copy-paste them into the terminal session. The console will send all commands to the ziServer and the server will interpret them one by one.
Note
Use the right-mouse button in order to copy-paste into a Windows Putty session.
cd [.zinode]#/DEVX#
SIGOUTS/*/ON 0
SIGOUTS/0/RANGE 1
SIGOUTS/0/AMPLITUDES/0 1
SIGOUTS/0/ENABLES/* 0
SIGOUTS/0/ENABLES/0 1
OSCS/0/FREQ 300000
SIGINS/0/RANGE 10
DEMODS/0/ORDER 2
DEMODS/0/RATE 1000
Connecting to ziServer over insecure or networks behind firewalls
If you want to connect to the ziServer over insecure, public networks like the public internet, you need to consider that the TCP/IP connection to the ziServer is unsecured. Also many firewalls will not allow traffic to port 8005. There are two common solutions to this problem. Either a VPN or a ssh port tunneling/forwarding. In this section ssh port tunneling/forwarding is described.
SSH port forwarding
You can use ssh to connect to a remote computer and use this connection to tunnel ziServer traffic between the local and remote computer.
To illustrate how port forwarding works, let us use an example. Suppose you have two buildings. In Lab #1, there is the lab with computers residing in the subnet 10.1.1.* and the HF2 is connected to one of these computers. At your Home, there are office computers residing in the subnet 10.2.2.*. The computers in Lab #1 are running the ziServer application that uses an unencrypted TCP/IP session to communicate data with, e.g., the LabOne UI at your home. The firewall of the Lab and your Home might not permit this connection to be initiated. There are two kinds of port forwarding: local and remote forwarding. They are also called outgoing and incoming tunnels, respectively. Local port forwarding forwards traffic coming to a local port to a specified remote port. For example, all traffic coming to port 1234 on the client could be forwarded to port 8005 on the server (host).
The value of localhost is resolved after the Secure Shell connection has been established – so when defining local forwarding (outgoing tunnels), localhost refers to the server (remote host computer) you have connected to. Remote port forwarding does the opposite: it forwards traffic coming to a remote port to a specified local port. For example, all traffic coming to port 1234 on the server (host) could be forwarded to port 8005 on the client (localhost).

Local port forwarding
Accessing a service (in this example ziServer port TCP/8005) on a
machine in the laboratory (10.1.1.) from your machine at home
(10.2.2.), simply by connecting to the server work.example.org at
work:
$ssh user@work.example.org -L 10000:172.16.10.10:8005
We see the ziServer is available on the loop back interface only, listening on port TCP/10000:
$ netstat -tunelp | grep 10000
tcp 0 0 127.0.0.1:10000 0.0.0.0:* LISTEN 1000 71679 12468/ssh
From your home machine, you should be able to connect to the machine at work:
$ telnet localhost 10000
By specifying localhost and port 10000 in the LabOne UI you can connect with the LabOne UI. Note that port 10000 is chosen arbitrarily.
Local port forward for anyone at home
If you want other people on your home subnet to be able to reach the machine at work by SSH, add the global option -g:
$ ssh user@work.example.org -L 10000:172.16.10.10:22 -g
We now see the service is available on all interfaces on your home computer (10.2.2.5), available for anyone to connect to on the local subnet:
$ netstat -tunelp | grep 10000 tcp 0 0 0.0.0.0:10000 0.0.0.0:* LISTEN 1000 72265 12543/ssh
Anyone on your local subnet should be able to connect to the machine at work by doing this:
$ telnet 10.2.2.5 10000
By specifying host 10.2.2.5 and port 10000 in the LabOne UI you can connect with the LabOne UI.
Remote port forwarding
Giving access to a ziServer (port TCP/8005) on your home machine (10.2.2.5) to people at work:
$ ssh user@work.example.org -R 10000:10.2.2.5:8005
We see on our server at work (on the loop back interface on port TCP/10000) that we have access to our SSH server at home:
work.example.org$ netstat -tunelp | grep 10000 tcp 0 0 127.0.0.1:10000 0.0.0.0:* LISTEN 0 73719534 3809/1
People logged in on the machine work.example.org now should be able to
SSH into your home machine by doing:
work.example.org$ telnet localhost 10000
Remote port forwarding for anyone at work
If you want everybody on the subnet at work to be able to SSH into your
home machine, there is no -g option for remote forward, so you need to
change the SSH configuration of work.example.org, add to
sshd_config:
GatewayPorts yes
Connect just as before:
home$ ssh user@work.example.org -R 10000:10.2.2.5:8005
Now, it is listening on all interfaces on the server at work:
work.example.org$ netstat -tunelp | grep 10000 tcp 0 0 0.0.0.0:10000 0.0.0.0:* LISTEN 0 73721060 4426/1
Anyone at work can now connect to your home machine by SSH via the server:
anyone.example.org$ telnet work.example.org 10000