LabOne Software Start-up
This section describes the start-up of the LabOne User Interface, which is used to control the MFIA Instrument. The start-up is slightly different depending on whether the LabOne software is installed on the PC (see Running LabOne on a Separate PC), or if the software on the Instrument is used. It’s not required to install LabOne on the PC to operate the Instrument. In case you use the software on the instrument, the first steps to connect to the instrument and open a browser window with the LabOne start-up screen are explained in Connecting to the MFIA Instrument.
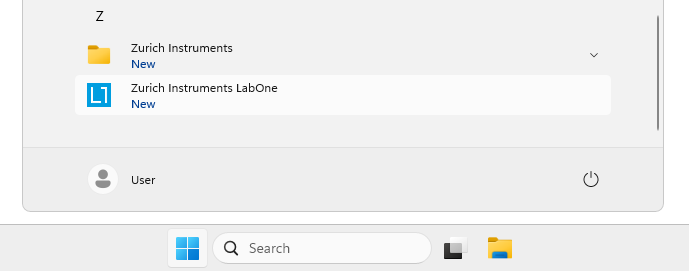
In case you have installed LabOne on the PC, the LabOne User Interface
start-up link can be found under the Windows 10 Start Menu (Under
Windows 7 and 8, the LabOne User Interface start-up link can be found in
Start Menu → all programs / all apps → Zurich Instruments LabOne). As
shown in Figure 1, click on
Start Menu → Zurich Instruments LabOne. This will open the User
Interface in a new tab in your default web browser and start the LabOne
Data Server and LabOne Web Server programs in the background.
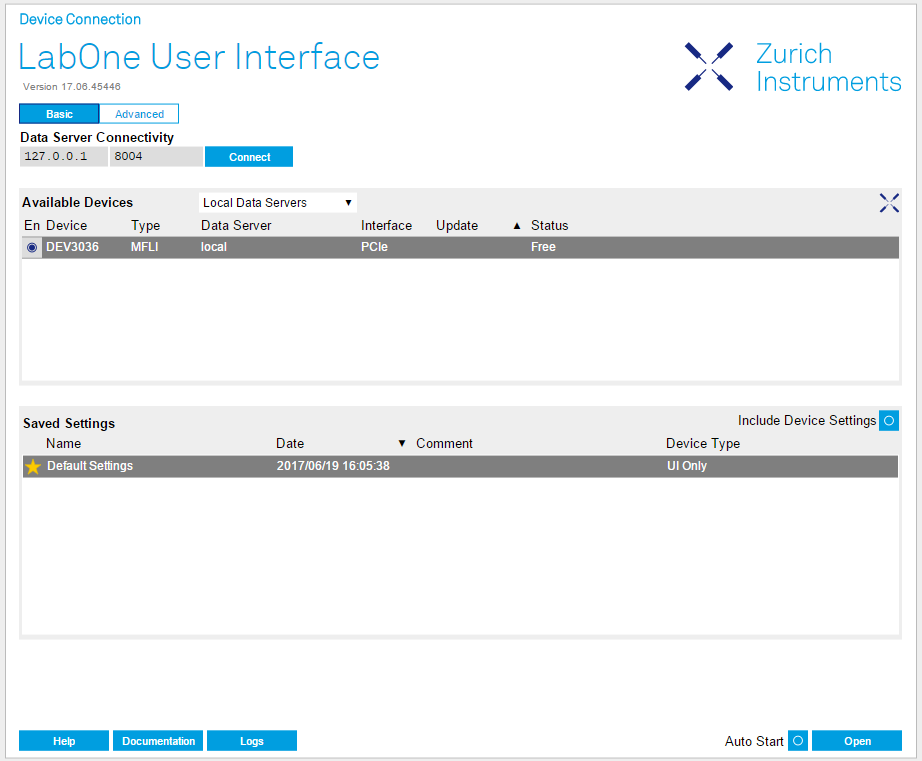
After starting LabOne, the Device Connection dialog Figure 2 is shown to select the device for the session. The term "session" is used for an active connection between the user interface and the device. Such a session is defined by device settings and user interface settings. Several sessions can be started in parallel. The sessions run on a shared LabOne Web Server.
The Device Connection dialog opens in the Basic view by default. In this
view, all devices that are available for connection are represented by
an icon with serial number and status information. If required, a button
appears on the icon to perform a firmware upgrade. Otherwise, the device
can be connected by a double click on the icon, or a click on the  button at the bottom right of the dialog.
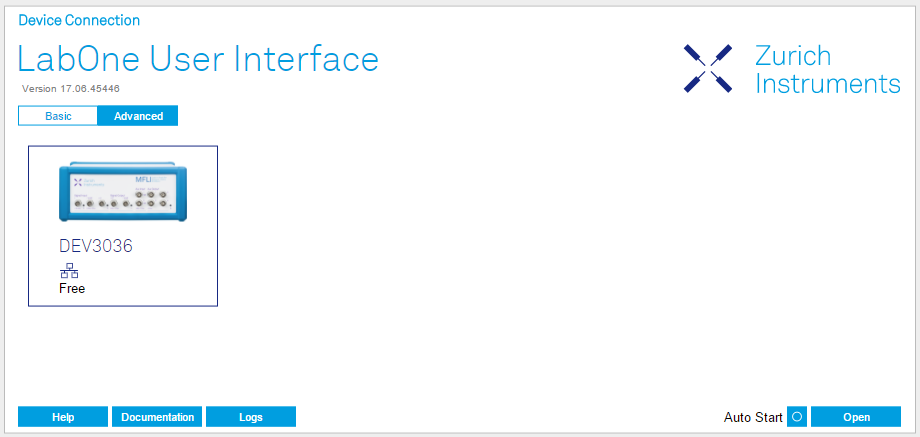
In some cases it’s useful to switch to the Advanced view of the Device Connection dialog by clicking on the "Advanced" button. The Advanced view offers the possibility to select custom device and UI settings for the new session and gives further connectivity options that are particularly useful for multi-instrument setups.
The Advanced view consists of three parts:
- Data Server Connectivity
- Available Devices
- Saved Settings
The Available Devices table has a display filter, usually set to Default Data Server, that is accessible by a drop-down menu in the header row of the table. When changing this to Local Data Servers, the Available Devices table will show only connections via the Data Server on the host PC and will contain all instruments directly connected to the host PC via USB or to the local network via 1GbE. When using the All Data Servers filter, connections via Data Servers running on other PCs in the network also become accessible. Once your instrument appears in the Available Devices table, perform the following steps to start a new session:
-
Select an instrument in the Available Devices table.
-
Select a setting file in the Saved Settings list unless you would like to use the Default Settings.
-
Start the session by clicking on
Note
By default, opening a new session will only load the UI settings (such as plot ranges), but not the device settings (such as signal amplitude) from the saved settings file. In order to include the device settings, enable the Include Device Settings checkbox. Note that this can affect existing sessions since the device settings are shared between them.
Note
In case devices from other Zurich Instruments series (UHF, HF2, MF, HDAWG, PQSC, GHF, or SHF) are used in parallel, the list in Available Devices section can contain those as well.
The following sections describe the functionality of the Device Connection dialog in detail.
Data Server Connectivity
The Device Connection dialog represents a Web Server. However, on start-up the Web Server is not yet connected to a LabOne Data Server. With the Connect/Disconnect button the connection to a Data Server can be opened and closed.
This functionality can usually be ignored when working with a single MFIA Instrument and a single host computer. Data Server Connectivity is important for users operating their instruments from a remote PC, i.e., from a PC different to the PC on which the Data Server is running or for users working with multiple instruments. The Data Server Connectivity function then gives the freedom to connect the Web Server to one of several accessible Data Servers. This includes Data Servers running on remote computers, and also Data Servers running on an MF Series instrument.
With the display filter set to "Local Data Server", all instruments accessible by a Data Server on the same computer and on an MFIA instrument connected to the PC are visible. With the filter set to "All Data Servers", all accessible Data Servers in the network are shown, including those running on other PCs.
Note
When using the filter "All Data Servers", take great care to connect to the right instrument, especially in larger local networks. Always identify your instrument based on its serial number in the form DEV0000, which can be found on the instrument back panel.
Available Devices
The Available Devices table gives an overview of the visible devices. A
device is ready for use if either marked free or connected. The first
column of the list holds the Enable button controlling the
connection between the device and a Data Server. This button is greyed
out until a Data Server is connected to the LabOne Web Server using the
 button. If a device is connected to a Data Server, no other Data Server
running on another PC can access this device.
button. If a device is connected to a Data Server, no other Data Server
running on another PC can access this device.
The second column indicates the serial number and the third column shows the instrument type. The fourth column shows the host name of the LabOne Data Server controlling the device. The next column shows the interface type. For MF Instruments the interfaces USB or 1GbE are available and are listed if physically connected. For MF series instruments the interface is indicated as PCIe in case the Data Server is running on the instrument, even if the physical connection between PC and instrument is USB or 1GbE. PCIe corresponds to the interface between the embedded PC and the measurement unit inside the MF instrument. The LabOne Data Server will scan for the available devices and interfaces every second. If a device has just been switched on or physically connected it may take up to 20 s before it becomes visible to the LabOne Data Server.
| Connected | The device is connected to a LabOne Data Server, either on the same PC (indicated as local) or on a remote PC (indicated by its IP address). The user can start a session to work with that device. |
| Free | The device is not in use by any LabOne Data Server and can be connected by clicking the Open button. |
| In Use | The device is in use by a LabOne Data Server. As a consequence the device cannot be accessed by the specified interface. To access the device, a disconnect is needed. Only applies to UHF Instruments. |
| Device FW upgrade required/available | The firmware of the device is out of date. Please first upgrade the firmware as described in Software Update. |
| Device not yet ready | The device is visible and starting up. |
Saved Settings
Settings files can contain both UI and device settings. UI settings control the structure of the LabOne User Interface, e.g. the position and ordering of opened tabs. Device settings specify the set-up of a device. The device settings persist on the device until the next power cycle or until overwritten by loading another settings file.
The columns are described in Table 2. The table rows can be sorted by clicking on the column header that should be sorted. The default sorting is by time. Therefore, the most recent settings are found on top. Sorting by the favorite marker or setting file name may be useful as well.
 |
Allows favorite settings files to be grouped together. By activating the stars adjacent to a settings file and clicking on the column heading, the chosen files will be grouped together at the top or bottom of the list accordingly. The favorite marker is saved to the settings file. When the LabOne user interface is started next time, the row will be marked as favorite again. |
| Name | The name of the settings file. In the file system, the file name has the extension .md. |
| Date | The date and time the settings file was last written. |
| Comment | Allows a comment to be stored in the settings file. By clicking on the comment field a text can be typed in which is subsequently stored in the settings file. This comment is useful to describe the specific conditions of a measurement. |
| Device Type | The instrument type with which this settings file was saved. |
Special Settings Files
Certain file names have the prefix "last_session_". Such files are created automatically by the LabOne Web Server when a session is terminated either explicitly by the user, or under critical error conditions, and save the current UI and device settings. The prefix is prepended to the name of the most recently used settings file. This allows any unsaved changes to be recovered upon starting a new session.
If a user loads such a last session settings file the "last_session_" prefix will be cut away from the file name. Otherwise, there is a risk that an auto-save will overwrite a setting which was saved explicitly by the user.
The settings file with the name "Default Settings" contains the default UI settings. See button description in Table 3.
| Open | The settings contained in the selected settings file will be loaded. The button "Include Device Settings" controls whether only UI settings are loaded, or if device settings are included. |
| Include Device Settings | Controls which part of the selected settings file is loaded upon clicking on Open. If enabled, both the device and the UI settings are loaded. |
| Auto Start | Skips the session dialog at start-up if selected device is available. The default UI settings will be loaded with unchanged device settings. |
Note
The user setting files are saved to an application-specific folder in the directory structure. The best way to manage these files is using the File Manager tab.
Note
The factory default UI settings can be customized by saving a file with the name "default_ui" in the Config tab once the LabOne session has been started and the desired UI setup has been established. To use factory defaults again, the "default_ui" file must be removed from the user setting directory using the File Manager tab.
Note
Double clicking on a device row in the Available Devices table is a quick way of starting the default LabOne UI. This action is equivalent to selecting the desired device and clicking the Open button.
Double clicking on a row in the Saved Settings table is a quick way of loading the LabOne UI with those UI settings and, depending on the "Include Device Settings" checkbox, device settings. This action is equivalent to selecting the desired settings file and clicking the Open button.
Tray Icon
When LabOne is started, a tray icon appears by default in the bottom right corner of the screen, as shown in the figure below. By right-clicking on the icon, a new web server session can be opened quickly, or the LabOne Web and Data Servers can be stopped by clicking on Exit. Double-clicking the icon also opens a new web server session, which is useful when setting up a connection to multiple instruments, for example.
![]()
Messages
The LabOne Web Server will show additional messages in case of a missing component or a failure condition. These messages display information about the failure condition. The following paragraphs list these messages and give more information on the user actions needed to resolve the problem.
Lost Connection to the LabOne Web Server
In this case the browser is no longer able to connect to the LabOne Web Server. This can happen if the Web Server and Data Server run on different PCs and a network connection is interrupted. As long as the Web Server is running and the session did not yet time out, it is possible to just attach to the existing session and continue. Thus, within about 15 seconds it is possible with Retry to recover the old session connection. The Reload button opens the Device Connection dialog shown in Figure 2. The figure below shows an example of the Connection Lost dialog.

Reloading...
If a session error cannot be handled, the LabOne Web Server will restart to show a new Device Connection dialog as shown in Figure 2. During the restart a window is displayed indicating that the LabOne User Interface will reload. If reloading does not happen the same effect can be triggered by pressing F5 on the keyboard. The figure below shows an example of this dialog.
